
Prelude | A Quick Start for the Impatient User
Introduction
Thank you for your interest in Virtual CRASH software! You’ll find that Virtual CRASH is an extremely powerful and versatile simulation tool, which can be quickly mastered [1]. This prelude is designed for users (or trial version testers) eager to dive into the Virtual CRASH environment and start manipulating vehicles. You will learn how to select a car from the gallery browser and import it into the scene. You’ll also discover how to set up a simulation and attach a vehicle to an animation path. First, let’s cover a few basic aspects of the user interface.
Virtual CRASH for Public Safety
This User’s Guide is intended for Virtual CRASH for Public Safety. Notice, many of the workflows are the same as those found in Virtual CRASH versions 3, 4, 5, and 6.
Trial Version Limitations
If you have not yet purchased a license of Virtual CRASH software, you will notice the application launches in “trial” mode. You’ll see “trail version” at the top of the application window. Please note, the trial version of Virtual CRASH is designed to give you a feel for its most important features and functions; as such, many features and functions are disabled. You will not be able to save projects, create videos, modify vehicle parameters, among others. While you can experiment with our “generic” vehicle and human figures (multibodies), changing geometrical input data is not possible.
USB Dongle
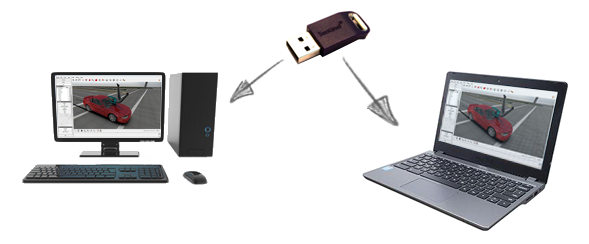
For each license of Virtual CRASH that is purchased, your organization will receive a physical USB dongle (“license key”). Note, this is not a hardware storage device, but a “key” to unlock Virtual CRASH software functionality. We require that Virtual CRASH software be installed locally on the same Windows desktop or laptop computer to which the display (monitor(s)) and user input devices (mouse and keyboard) used to operate Virtual CRASH are directly connected. The USB dongle must be plugged into this exact same local computer and cannot be used on a remote machine or through a network connection (see EULA). USB-to-IP Windows applications can disrupt the proper functioning of the Virtual CRASH USB dongle and may cause Virtual CRASH to launch only in trial mode. With the trial version launched, once a USB dongle is plugged into the user’s machine, all functionality will be enabled.
Changing Themes
You can change the theme used by Virtual CRASH for Public Safety by going to Window > Theme. The theme used for the images below is “Light”.
Font and Icon Size
The font and icon sizes can be increased by going to Window > Set Font.
Use the pop-up horizontal slider to set the font and icon sizes as needed.
Unit Preferences
When you first start Virtual CRASH for Public Safety, speed units are set to kilometers per hour, length in meters, and mass/weight in kilograms. To change the units, simply left-click on the “units” menu in the left-side control panel. Then, left-click on the type of parameter (velocity (speed), metric (length), mass (weight)) to access the dropdown menu, and select the desired unit. These preferences will be automatically saved for future sessions.

The Virtual Tutor
The first thing you should familiarize yourself with in Virtual CRASH is the innovative “Virtual Tutor” feature. The Virtual Tutor will help you understand where to access most of the functions within Virtual CRASH by literally taking over your mouse and showing you! To access the Virtual Tutor help topics, go to the lower portion of the left-side control panel and left-click on “help”.
Now you should see a list of topics from which you can select. Note, the “player speed” option is above the list and can be used to slow down or speed up the lessons.
Next, select your lesson by left-clicking a topic and watch the tutorial.
Select a Vehicle and Place it into the Scene
To place a vehicle into the scene, first left-click on “gallery” in the left-side control panel. This will open the gallery browser. The gallery browser contains a list of all 3D vehicles, 2D vehicle icons, signs, textures, and other types of objects that can be placed within the scene.
The gallery browser is divided into two halves. The upper half allows you to use a hierarchy to search by object type of vehicle make. The lower half shows you which vehicles or other objects fall within the selected category. For example, when the gallery opens, the “medium” category is opened by default. “Medium” indicates the level of vehicle detail is medium to high. Hover your mouse cursor in the area shown in the red box below and use your scroll wheel to scan up or down the list of vehicle makes. Left-click on the desired vehicle make.
Next, place your mouse cursor in the lower half of the gallery browser window. Use your mouse’s scroll wheel to scan up and down the window. You will see images of the available models. If you wish to see all models, without filtering by make, then left-click “medium” in the upper half.
Left-click on the database icon in the upper-right corner of the vehicle graphic, hold the mouse button, drag your cursor into the workspace and release the left button. You should see an instance of the vehicle appear in the workspace. You can create as many instances of the vehicle as needed using this method (cloning vehicles is discussed in other chapters).
Below is the trial version’s “generic” vehicle. You are limited to using only this vehicle in the trial version.
Link Vehicle to Animation Path
In order to set your vehicle in motion, you’ll first need to link it to an animation path. First, go to Create > Animation > Animation Path and left-click. This activates the Path Animation tool.
Next, hover your mouse over the vehicle you wish to link to an animation path. It will turn light blue in response. Left-click on the vehicle. This will link the vehicle to your path.
Left-click in the environment to begin dropping control vertices. The control vertices control the shape of the animation path. Right-click in the scene to drop the final control vertex, then right-click again to completely terminate path animation creation.
To see the control vertices (CVs), change the mouse cursor control type to “Select, Move And Manipulate”. The CVs will appear as yellow dots. You can left-click, hold, and drag these CVs with your mouse to change the animation path trajectory shape as needed.
To see the various settings that control the linked vehicle’s behavior, left-click the “edit” button in the left-side control panel. Next, left-click on the name of the animation path shown in the project menu. Once the animation path is selected, you should see its properties appear in the “properties menu.” Here we highlight the animation path’s “sequences” menu, which controls the progression of kinematics inputs for the linked vehicle.
The Path Animation tool will be described in more detail in the chapters below.
Appearance
Press [Ctrl+7] on your keyboard, or use select “Smooth + Texture” from the render mode menu to improve the appearance of your project as it appears in your interactive workspace.
Compatibility
Virtual CRASH for Public Safety does not open vc6, vc5, vc4, or vc3 files.
Notes:
[1] When using any accident reconstruction software tool, it is imperative the user perform all necessary consistency checks to ensure the simulated results are in good agreement with expectations from standard forensic techniques. It is also imperative the user understand the limitations of the software tool, as well as understand potential sources of uncertainties in depicted results, including but not limited to, user uncertainties in input parameters as well as those related to object positions and orientations within the project environment.
Tags: Quick start, animation path, how to watch tutorial, virtual tutor, make a vehicle, put vehicle in scene, how to an animation, gallery.
© 2022 Virtual CRASH, LLC. All Rights Reserved