

Chapter 13 | The Human Models
Introduction
Virtual CRASH allows users to quickly simulate accidents involving pedestrians, motorcyclists, bicyclists, and more. With its streamlined user interface, and its blazing fast multibody collision algorithm, analysts can study and refine their case studies in a flash. One of the most unique features of Virtual CRASH are its incredibly realistic human models. We’re going to explore these human models, and discuss how they can be modified to better suit your needs. Most of the workflow below is illustrated in a prior version of Virtual CRASH, but also applies to Virtual CRASH 6.
What is the Human Model
In Virtual CRASH, the human model is a series of ellipsoid objects connected by “Ragdoll Joint” types.
The initial default pose of the human model is determined by an “.mbdef” file contained in the data/multibody/poses/human directory of the Virtual CRASH installation area. The Ragdoll joints allow the user to fix angles of articulation, as well as allow for restricting ranges of motion by the use of joint-torque stiffness values, to better simulate physiological limits of the human body. This will also be discussed further below.
The human models are covered with a realistic looking exterior, giving HD animations and incredibly realistic look and feel; however, the user has the option to remove the outer cover to create animations showing the underlying ellipsoids. This is discussed below.
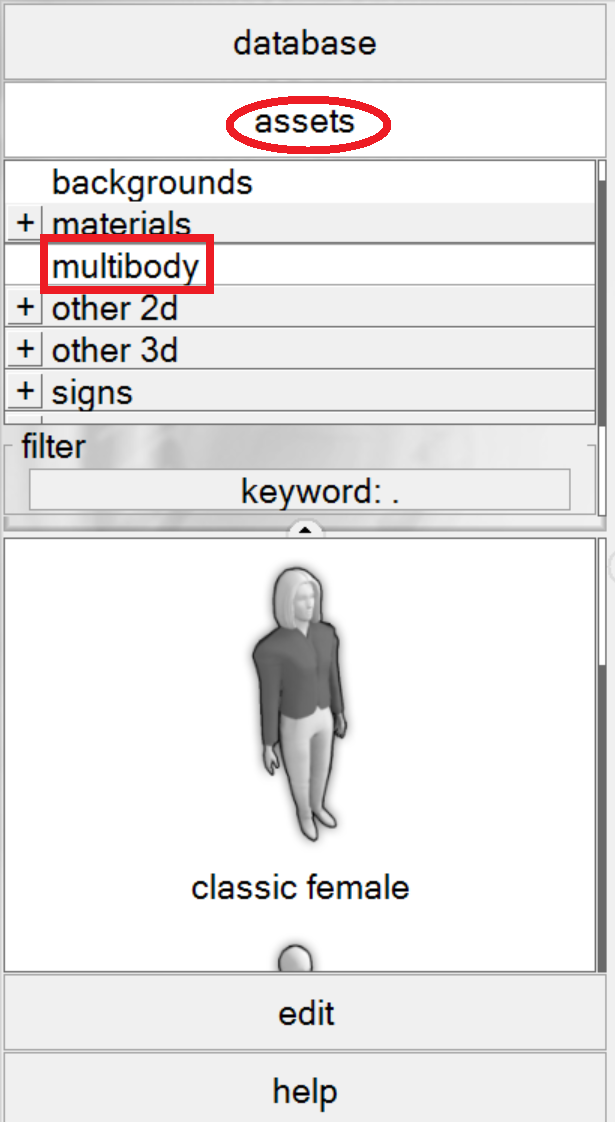
Virtual CRASH has both male and female human models with outer covers (see next two figures).
Inserting a Human Model into a Simulation
Let’s start a new Virtual CRASH project so we can insert a human model object in our workspace. First head over to the assets browser (learn about the assets browser here >).
Left-click on “multibody” in the assets browser. Hold+left-click on “classic male” and drag and drop into your scene.
You should now see your human model in the scene.
Now, left click on “edit” in the lower left corner, in the left control panel. This should reveal the properties options for the human model.
Changing Weight
Left click on “mass properties” to change the weight (mass) of your human model.
Changing Height
Left click on “size” to adjust the human model’s total height. You’ll notice the various body segments decrease or increase in size in relative proportion to the change in height.
Pre-defined Poses
Left click on “poses” to select from one of the many predefined poses within Virtual CRASH. To choose a pose, simply left clock on the pose’s name. You will see the human model automatically update to assume the selected pose.
The Optimize Feature
Now, left click on “dynamics” in the left control panel to reveal the various initial dynamical properties of the human model. Here you can set the initial linear and angler velocity vectors. Deselect the “optimize” option in order to see the effect this has on your human model. You’ll notice the human model quickly collapses to the ground plane (see below). Virtual CRASH will hold a human model’s initial pose (optimized) until a collision event is detected, at which point, the human model is allowed to act as a free body. By disabling this feature, you are simply allowing the human model to act as a free body without regard to collisions.
Auto Align to Plane
As you were experimenting with the human model, you may have noticed that it seems to always stay connected to the xy plane. This is because the “auto align to plane” feature is enabled by default. You can disable this feature by left clicking on “misc” in the left control panel. Then deselect “auto align to plane”. If you then select your human model, then right click to pull up the quick commands dialogue box, you can set its z component to any arbitrary value, without having the model snapped back to the xy plane (see below). Deselecting “auto align to plane” can be useful in cases where you need to elevate the model for its pre-impact configuration (such as a motorcycle or bicycle rider).
Manipulating Joints
In Virtual CRASH, you have access to the human model’s joints, and you can modify the joint properties to suit your specific needs. To visually see the joints, left click on the box icon on the upper tool bar, then left click on “Joints”. You should be able to visualize all of the joints in the human model’s body.
You can learn more about the various types of joints in Virtual CRASH, as well as how the various joint parameters are used, at the following Blog post:
https://www.vcrashusa.com/blog/2018/6/7/building-complex-systems-with-joint-tools
Rotation
Next, click on the “joints” button in the left control panel to reveal the joint options. You can scroll through the list of all joints, and click on the name of a particular joint to select it, or you can left click on the joint itself within the simulation environment. By selecting a joint, you reveal its properties. Try to rotate the right arm by selecting the “right upper arm – right lower arm” joint, then constraint your cursor to Restrict to Y (Rotations) by using the restriction selection menu on the upper tool bar. Once you’ve done this, use the rotation grip to rotate the lower arm.
Fixed Orientation
Once you are satisfied with the initial pose of your human model’s joint, you have the option to force the joint to maintain that orientation by left clicking on “fix orientation” and then selecting “use” (see below). The joint will maintain the specified articulation by using a linear spring model with damper, with equilibrium position at your specified articulation angle. You can choose the spring and damping coefficients. The larger the spring constant, the more torque is required to move the joint out of the initial configuration.
Starting from the “torso - hip” joint at the top of the list to the left, left click “torso – hip” and hold the left mouse button as you drag your mouse downward to select all joints simultaneously. You should see all of the joints appear red to indicate they have been selected.
Now, fix the orientation of all joints by following the same procedure. Left click on “fix orientation” and then left click on the box to the left of“use”. Next, use the scroll bar to increase the spring constant to a very large value. Because all of the joints were selected, this will increase the stiffness of all joints within the body. Finally, disable the “optimize” feature as was demonstrated above, and watch the human model fall over. Although the model fell over, you should see it maintaining its pre-fall pose.
Severing Limbs
You can use the “breaking” option to simulate the severing of limbs in pedestrian impacts. First, left click on the label of the joint for which you wish to enable this feature. Next, select the breaking option under the “breaking” title in the left control panel. You can select the threshold at which limbs will sever using the force threshold sliders.
Ragdoll Joints
Virtual CRASH uses a special joint type for the human model; this is called the “Ragdoll Joint”. You can experiment with this joint type by taking two rigid body objects and connecting them by this joint type.
The Ragdoll Joint has three angles or articulation as depicted in the figure below.
Specification of Human Model Parameters
The human model parameters are specified in the .mbdef file. You can find these files for the male (“pedestrian.mbdef”) and the female (“female.mbdef”) models in the data/multibody directory of your installation area.
By opening “pedestrian.mbdef” you will see the definition of body segment masses, sizes, positions, and orientations (see below). Before modifying any of these values, it is advisable to first create a new copy of this file and save it under a different name in the same directory.
Scrolling further down, you will see the various joint properties defined (see below). Here you will find the articulation limits (LIMIT0, LIMIT1, LIMIT2) for each joint, which correspond to the articulation types depicted previously. You can further constrain your human model by modifying these limits.
A summary of the male human model segment data can be found in Table 9.
Table 9
The Naked vCRASH Man
The outer cover of the human models can be removed to reveal the underlying ellipsoid structure. This is useful in cases where you do not wish a realistic human to appear in your animation. To hide the outer cover, simply go to your copy of the “.mbdef” file, and change the word “SURFACE” to “# SURFACE” as shown below. Resave this file in the data/multibody subdirectory of your release area.
When you reopen Virtual CRASH, you should see the name of your custom “.mbdef” file in the multibody dropdown menu in the left control panel.
Tags: Human body model, ragdoll joints, human model data, human weight, human mass, human height, change weight, change mass, change height.
© 2024 Virtual CRASH, LLC. All Rights Reserved